Read the other installments in the “Sharpen This” series via this link.
People say that “sharp” is like pornography – you know it when you see it.
The problem with that statement is that you cannot see sharpness. When a tool is sharp, its edge becomes practically invisible to light. You can, however, see an edge when it’s dull. If you are confused by the above statements, don’t worry. By the end of this blog entry you will truly understand the difference between sharp and dull.
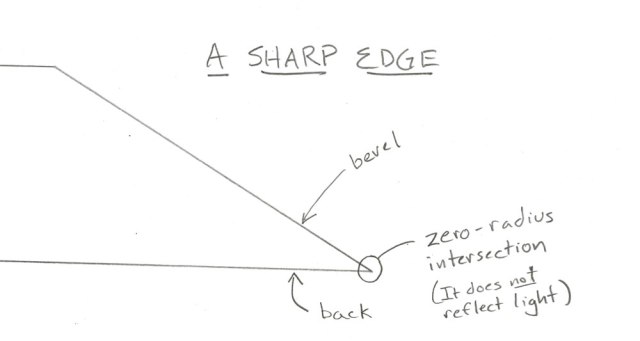
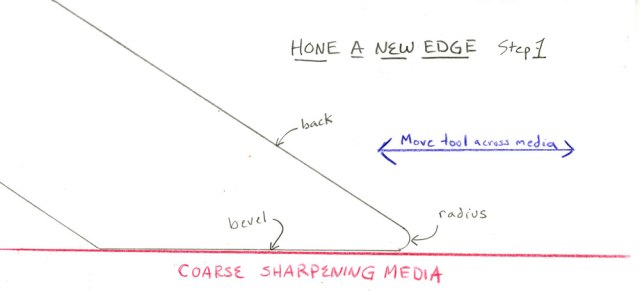
Let’s begin by discussing the definition of a sharp edge because it is incredibly important. Here it is: A sharp edge is two surfaces that intersect and create a zero-radius intersection.
Like many definitions, this one needs some definition. What does this mean?
Think of a chisel. Its bevel is one surface. The tool’s back is the second one. The surfaces don’t have to be flat; nor do they have to be curved. They just have to meet. Where they intersect is the edge. And when they meet at a “zero-radius intersection” you have a sharp edge.
What’s a zero-radius intersection? This is when the intersection of the two surfaces is not a radius or a rounded-over bit. Instead, in a best-case and theoretical scenario, the bevel and the back intersect and share a single line of iron atoms in a crystalline matrix with carbon. That line of particles is what wedges between the wood fibers and separates them cleanly.
That is sharp – as sharp as it gets. So what is dull?
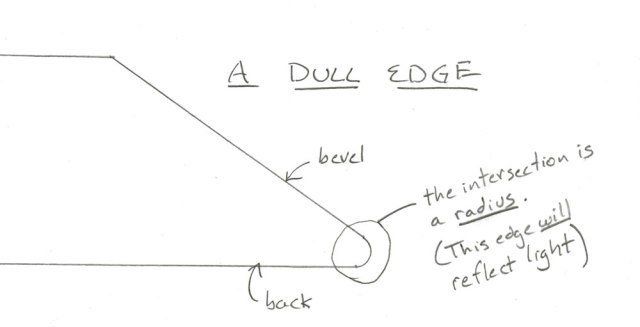
Dull is where you have two surfaces that intersect, but their intersection is a radius or a rounded-over section. A million things could cause this radius to exist. Perhaps the maker of the tool failed to grind the two surfaces so they meet. Perhaps the two surfaces once met at a zero-radius intersection, but then the owner used the tool to do some woodworking. When you push a steel edge into the wood many times, tiny steel particles at the tip wear off, creating a rounded-over radius.
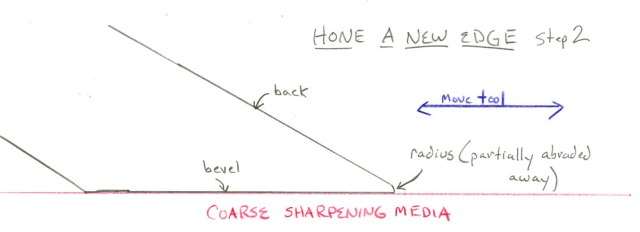
The goal of sharpening is to re-establish the zero-radius intersection.
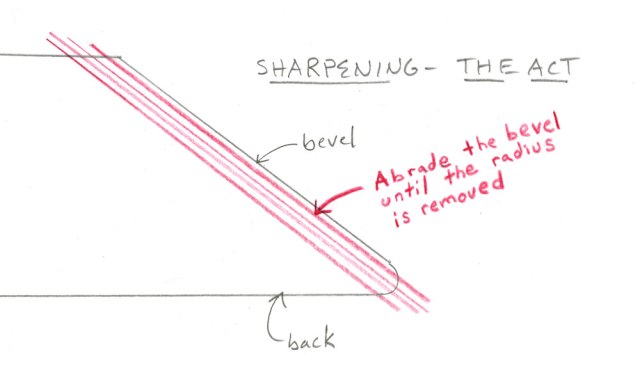
You do this by abrading one (or both) of the surfaces until they meet again with a zero-radius. Note that this task can be done with any abrasive. A coarse abrasive will do this quickly but leave deep scratches in the edge that make it fragile. Fine abrasives will do the work slowly and you will want to take up golf.
And I repeat: Any abrasive can make an edge sharp. Fine abrasives don’t really make the edge sharper, they just make the edge more durable. But more on that topic in a future blog post.
Meet the Burr
So the first goal of sharpening is to ensure you have two surfaces that meet at a zero-radius intersection. But how do you know when you have achieved it? Easy. When you create a zero-radius intersection, a magical thing happens: You create a small metal burr on the surface that isn’t being abraded.
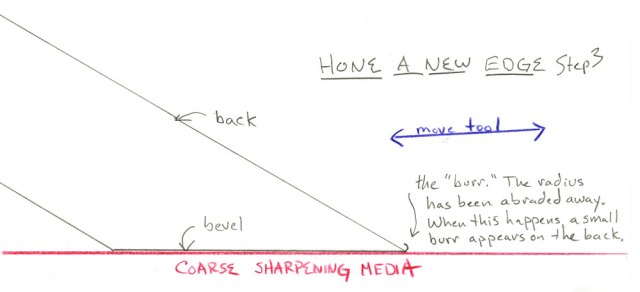
This burr is the heart of sharpening. It is the only thing (other than an electron microscope) that will tell you that you have created a sharp edge. Once you have the burr, the edge is sharp. Polishing will refine it.
So what did I mean at the beginning of this entry when I said “you cannot see sharpness?” Easy. A radius reflects light. When you look at your chisel and see a bright line where the bevel and back meet, that’s the radius smiling back at you. It’s time to sharpen.
But when you are done sharpening, have achieved a zero-radius intersection and have removed the burr (more on that later), there is nothing that can reflect light back to your eyeball. Sharpness is invisible.
That fact is one of the great curiosities of sharpening: It is a great labor to create nothingness (cue the sitar solo, dude).
— Christopher Schwarz