When people ask what sort of books we publish at Lost Art Press, my answer is simple: Difficult books.
Not all of our books experience troubled gestation periods, but many do. “Make a Joint Stool from a Tree,” was one of the most trying. In fact, it probably wouldn’t have been published if it weren’t for Peter Follansbee‘s unending patience/pigheadedness.
Peter and Jennie Alexander had been working on the manuscript off and on for years. When Lost Art Press offered to publish it, Peter went into high gear to get it completed. And after months of work, we had a finished book that was ready to go to the printer. But there was one big obstacle: Getting Jennie to sign off on the text.
After working with Jennie for many years, I concluded that she was more interested in continuing her research instead of publishing the results. We sent her printed proofs of the finished book, but she said she couldn’t read them easily. So Peter did something extraordinary. Over two evenings, Peter read every word of the book to Jennie over the phone. He took careful notes on what she wanted changed.
And, miracle of miracles, Jennie signed off on the work.
And thank goodness. “Make a Joint Stool from a Tree” is an eye-opening look at how early joinery was performed – and it’s not like how we do it in modern shops today. The book weaves historical research and practical work together with photos and drawings (made by Roy Underhill’s daughter, Eleanor!) to present a clear and complete picture.
The following is excerpted from “Make a Joint Stool from a Tree,” by Jennie Alexander and Peter Follansbee. This book is in its second printing, and we’ve updated the paper stock to a matte coated stock that prints more crisply, plus it’s now a casebound hardcover format and is printed at a different plant (the old one went out of business). As a result of these changes, we’ve lowered the price significantly.
— Christopher Schwarz
/*<![CDATA[*/
(function () {
var scriptURL = 'https://sdks.shopifycdn.com/buy-button/latest/buy-button-storefront.min.js';
if (window.ShopifyBuy) {
if (window.ShopifyBuy.UI) {
ShopifyBuyInit();
} else {
loadScript();
}
} else {
loadScript();
}
function loadScript() {
var script = document.createElement('script');
script.async = true;
script.src = scriptURL;
(document.getElementsByTagName('head')[0] || document.getElementsByTagName('body')[0]).appendChild(script);
script.onload = ShopifyBuyInit;
}
function ShopifyBuyInit() {
var client = ShopifyBuy.buildClient({
domain: 'lost-art-press-test.myshopify.com',
storefrontAccessToken: 'f83226aac752f3a8e262f8a8273c9739',
});
ShopifyBuy.UI.onReady(client).then(function (ui) {
ui.createComponent('product', {
id: '194295193',
node: document.getElementById('product-component-1633393146673'),
moneyFormat: '%24%7B%7Bamount%7D%7D',
options: {
"product": {
"styles": {
"product": {
"@media (min-width: 601px)": {
"max-width": "calc(25% – 20px)",
"margin-left": "20px",
"margin-bottom": "50px"
}
},
"button": {
"font-size": "14px",
"padding-top": "15px",
"padding-bottom": "15px",
"border-radius": "11px",
"padding-left": "22px",
"padding-right": "22px"
},
"quantityInput": {
"font-size": "14px",
"padding-top": "15px",
"padding-bottom": "15px"
}
},
"text": {
"button": "Add to cart"
}
},
"productSet": {
"styles": {
"products": {
"@media (min-width: 601px)": {
"margin-left": "-20px"
}
}
}
},
"modalProduct": {
"contents": {
"img": false,
"imgWithCarousel": true,
"button": false,
"buttonWithQuantity": true
},
"styles": {
"product": {
"@media (min-width: 601px)": {
"max-width": "100%",
"margin-left": "0px",
"margin-bottom": "0px"
}
},
"button": {
"font-size": "14px",
"padding-top": "15px",
"padding-bottom": "15px",
"border-radius": "11px",
"padding-left": "22px",
"padding-right": "22px"
},
"quantityInput": {
"font-size": "14px",
"padding-top": "15px",
"padding-bottom": "15px"
}
},
"text": {
"button": "Add to cart"
}
},
"option": {},
"cart": {
"styles": {
"button": {
"font-size": "14px",
"padding-top": "15px",
"padding-bottom": "15px",
"border-radius": "11px"
}
},
"text": {
"total": "Subtotal",
"button": "Checkout"
}
},
"toggle": {
"styles": {
"count": {
"font-size": "14px"
}
}
}
},
});
});
}
})();
/*]]>*/
About Drawboring
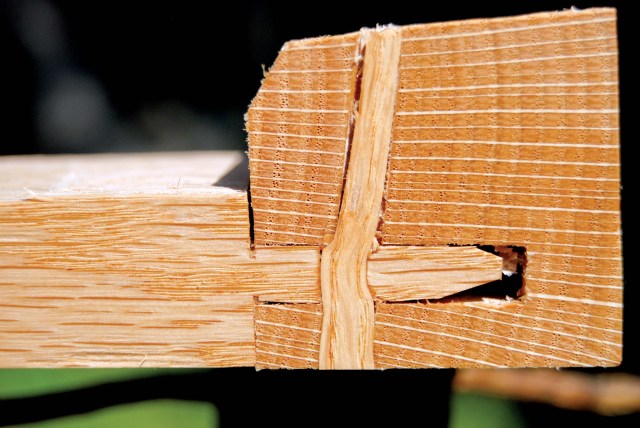
Now we come to the most exciting part of the work. Drawboring is the heart of the matter – get it right and your stool should last hundreds of years. Simply put, drawboring is an intentional misalignment of the holes bored in the mortises and tenons. These holes are bored through each component separately, and they are offset so that a tapered pin driven into them will pull the tenoned rail up tight against the mortised stile. We know this technique is a period practice because we have seen it in surviving works, sometimes in disassembled pieces, or in those worn down by misuse. Fig. 6.10 is a pin removed during restoration from a New England joined chest made about 1670-1690, clearly showing the kink in the pin resulting from snaking its way through the offset holes. In addition to this sort of evidence, we have a documentary record for drawboring as well. Joseph Moxon describes it in his section on joinery:
Then with the Piercer pierce two holes through the Sides, or Cheeks of the Mortess, about half an Inch off either end one. Then knock the Tennant stiff into the Mortess, and set it upright, by applying the Angle of the outer Square, to the Angle the two Quarters make, and with your Pricker, prick round about the insides of the Pierced holes upon the Tennant. Then take the Tennant out again, and Pierce two holes with the same Bit, about the thickness of a Shilling above the Pricked holes on the Tennant, that is, nearer the shoulder of the Tennant, that the Pins you are to drive in, may draw the Shoulder of the Tennant the closer to the flat side of the Quarter the Mortess is made in. Then with the Paring-chissel make two Pins somewhat Tapering, full big enough, and setting the two Quarters again square, as before, drive the Pins stiff into the Pierced holes.
With the test-fitted frames on the bench, mark the tenons for the pins that will secure these joints for the next few centuries. The faces of rails and stiles must be in the same plane. The rails’ outer shoulders should be a tight fit against the stiles’ arrises. The inside shoulders should not touch the stiles.
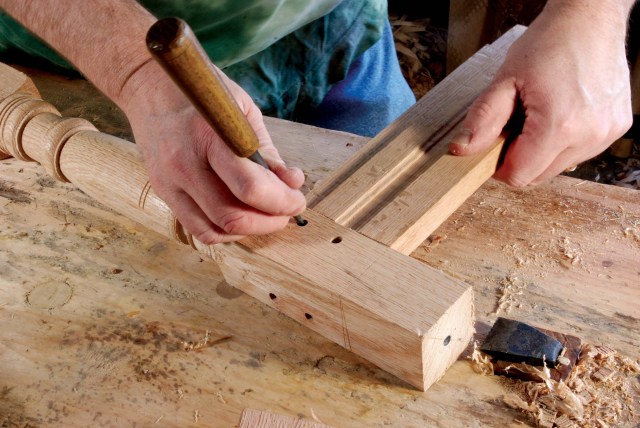
Check that the apron’s upper edge lines up properly with the marks on the stiles that define the top of the stool. At the stretcher level, be sure there’s no gap in the mortise above the stretcher, where it will be visible in the finished stool. If there is a gap, bump the stretcher upward, shifting the space beneath the stretcher. You might need to check the end grain of the mortise; sometimes it intrudes into the mortise and needs to be cut back so the rail will bump up into its proper position. When all that is checked, scribe inside the hole onto the tenon face with a thin, sharp awl.
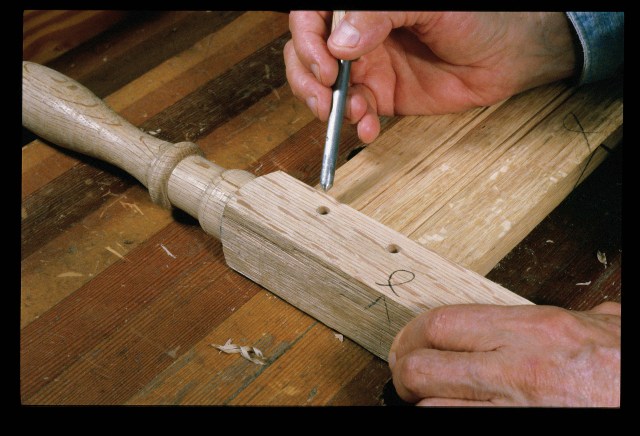
Alexander prefers lightly tapping a centerpunch into the pin hole. Make a punch by pointing the shank of an old drill bit or steel rod that fits snugly into the pin hole.
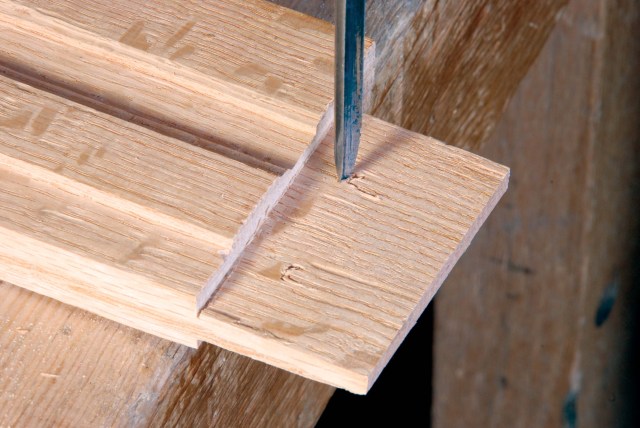
Disassemble the frame and bore the holes in the tenons. It is critical to remember to move in the proper direction – toward the tenon shoulder! You can eyeball this placement, or you might find it helpful to mark the center of the tenon’s pin hole. With the awl, prick the new centerpoint about 1/16″ closer to the tenon shoulder.
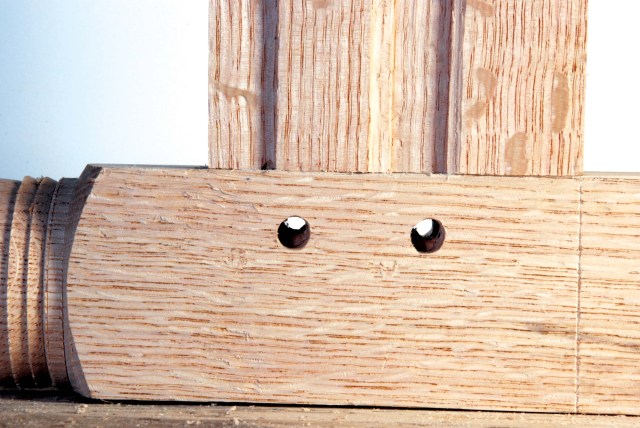
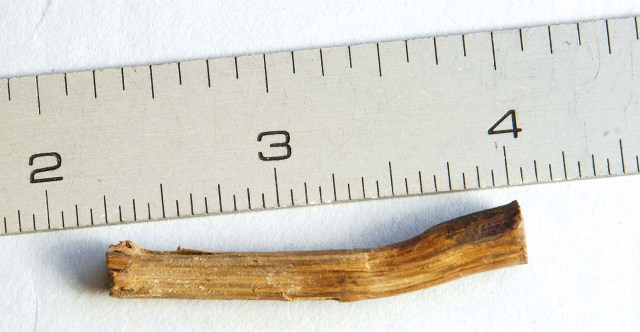
Reassemble the joint and sight through the offset holes. Refer to fig. 6.13 for a general idea of what we’re after; the offset should take up about one-quarter to one-third of the hole. When you have bored all four tenons for one frame, you can test-assemble this frame yet again, and lightly pull the joints tight by driving in tapered metal “drawbore pins.” These pins can be easily made by adapting a machinist’s alignment pin. Any rod or awl that tapers from 5/32″ to 5/16″ along 4″ can be used. Installed in octagonal cross-sectioned wooden handles, they can be tapped in with a hammer and easily removed by hand.
If there is a question about a particular joint, remove the pin and sight through the hole against the light. If the interference is too great, use a handheld square-tapered reamer to enlarge the tenon hole. This tool is nothing but a drawbore pin that has been filed to a sharp-edged square cross-section. You are approaching final assembly. Don’t hurry. Drawboring is the heart of the matter. …
Make the Pins
For the pins to pull the joints together, they must be incredibly strong. Make them from the straightest-grained off-cuts you can find. Alexander and Follansbee have different approaches to pins; we will show you both methods.
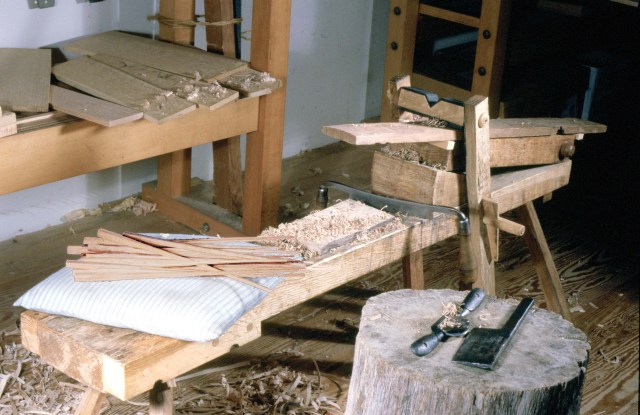
Alexander uses a shaving horse and drawknife to make very carefully tapered long pins from riven straight stock. Select the best straight-grained 15″-long rail stock. Rive this into ½”-square sticks. Hold the stick in a shaving horse and drawknife a 5″-long square on the butt so that the shaving horse can secure the stick and register it when it is rotated 90° at a time. Support the thin stock with a narrow board held under the workpiece. Place the square butt under the shaving horse jaw and make a 10″-long taper. Bore a test hole in a thin board with your piercer bit and taper the pin until it goes halfway through. Try your drawknife with the bevel down and up to see what works best for you. After the tapered square stick is finished, slightly relieve the corners.
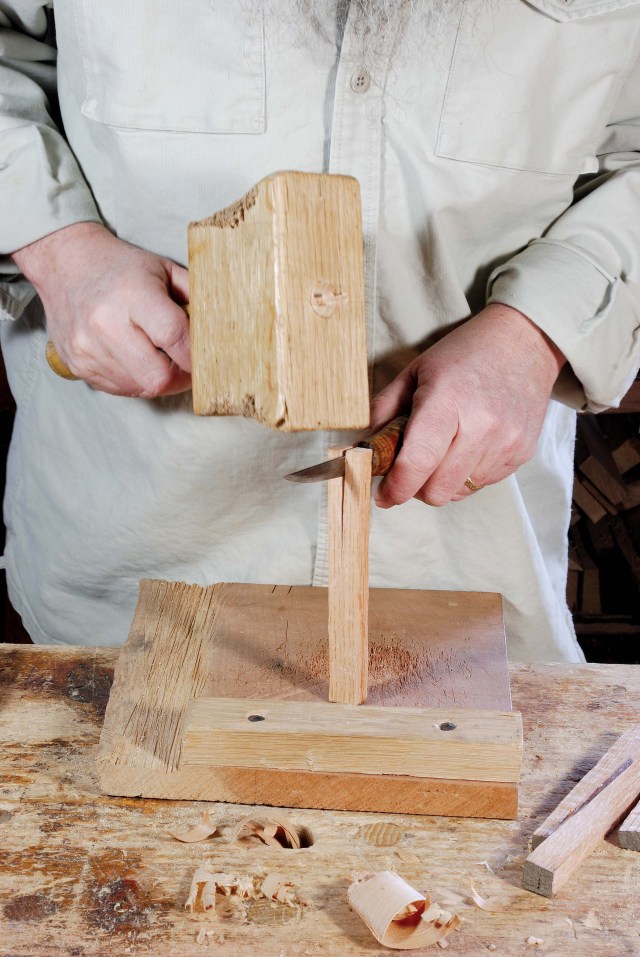
Follansbee shaves pins at the bench from short (5″- to 8″-long) stuff using a large broad chisel. These blanks are riven into sections about ⅜” square using a stout knife or small cleaver as a sort of mini-froe. Hold the blank from its top end and shave downward with the broad chisel. Position the tip of the pin on a piece of scrap wood so you don’t mark up your bench. Working each face in turn, shave them into even squares. Then taper them by paring down with the chisel, taking shavings from each face for an even taper. Sometimes you need to flip the pin end-for-end to get the right amount of taper. Once it’s tapered, shave off the corners so the resulting piece is generally octagonal. Then point the thin tip with your chisel or a knife.

People are leery of shaving small stuff like these pins with a large chisel, but like many of these procedures, body position and movement make this task simple and efficient. For a right-handed joiner, hold the chisel in your right hand with the forefinger extended along the back of the chisel. The chisel is braced in your grip, and your arm is tucked against your torso. The movement comes from your legs. Rise up on your right foot and come down with the chisel in place. With your arm braced against your torso, you limit the travel of the chisel. It is quite a short stroke. This posture provides considerable power and accuracy. With some practice you will become quite accurate and able to shape pins quickly and easily.
/*<![CDATA[*/
(function () {
var scriptURL = 'https://sdks.shopifycdn.com/buy-button/latest/buy-button-storefront.min.js';
if (window.ShopifyBuy) {
if (window.ShopifyBuy.UI) {
ShopifyBuyInit();
} else {
loadScript();
}
} else {
loadScript();
}
function loadScript() {
var script = document.createElement('script');
script.async = true;
script.src = scriptURL;
(document.getElementsByTagName('head')[0] || document.getElementsByTagName('body')[0]).appendChild(script);
script.onload = ShopifyBuyInit;
}
function ShopifyBuyInit() {
var client = ShopifyBuy.buildClient({
domain: 'lost-art-press-test.myshopify.com',
storefrontAccessToken: 'f83226aac752f3a8e262f8a8273c9739',
});
ShopifyBuy.UI.onReady(client).then(function (ui) {
ui.createComponent('product', {
id: '194295193',
node: document.getElementById('product-component-1632853790198'),
moneyFormat: '%24%7B%7Bamount%7D%7D',
options: {
"product": {
"styles": {
"product": {
"@media (min-width: 601px)": {
"max-width": "calc(25% – 20px)",
"margin-left": "20px",
"margin-bottom": "50px"
}
},
"title": {
"font-size": "17px"
},
"button": {
"font-size": "14px",
"padding-top": "15px",
"padding-bottom": "15px",
"border-radius": "11px",
"padding-left": "22px",
"padding-right": "22px"
},
"quantityInput": {
"font-size": "14px",
"padding-top": "15px",
"padding-bottom": "15px"
}
},
"text": {
"button": "Add to cart"
}
},
"productSet": {
"styles": {
"products": {
"@media (min-width: 601px)": {
"margin-left": "-20px"
}
}
}
},
"modalProduct": {
"contents": {
"img": false,
"imgWithCarousel": true,
"button": false,
"buttonWithQuantity": true
},
"styles": {
"product": {
"@media (min-width: 601px)": {
"max-width": "100%",
"margin-left": "0px",
"margin-bottom": "0px"
}
},
"button": {
"font-size": "14px",
"padding-top": "15px",
"padding-bottom": "15px",
"border-radius": "11px",
"padding-left": "22px",
"padding-right": "22px"
},
"quantityInput": {
"font-size": "14px",
"padding-top": "15px",
"padding-bottom": "15px"
},
"title": {
"font-family": "Helvetica Neue, sans-serif",
"font-weight": "bold",
"font-size": "26px",
"color": "#4c4c4c"
}
},
"text": {
"button": "Add to cart"
}
},
"option": {},
"cart": {
"styles": {
"button": {
"font-size": "14px",
"padding-top": "15px",
"padding-bottom": "15px",
"border-radius": "11px"
}
},
"text": {
"total": "Subtotal",
"button": "Checkout"
}
},
"toggle": {
"styles": {
"count": {
"font-size": "14px"
}
}
}
},
});
});
}
})();
/*]]>*/