One of the most important early books on woodworking has been indecipherable to everyone who cannot read 18th-century French. Andre Roubo’s landmark five-volume “L’Art Du Menuisier” is difficult to find – reprints are available mostly in Europe and at Tools for Working Wood – and even harder to actually use.
To my knowledge, no one has attempted a systematic translation of these books, which cover furniture-making, carpentry, marquetry, carriage-building and garden structures.
Ever since I first got a glimpse of Roubo’s books, with their exquisite oversized engravings of woodworking tools, benches and practices, I was hooked and really wanted to engage in a full translation. But rather than learn 18th-century French, I’ve enlisted the help of Bjenk Ellefsen, a woodworker, post doctorate fellow in cross-national comparative socio-economical studies and native French speaker.
Bjenk has been reading and translating volume one on carpentry and construction for us, and we are going to publish it here in installments on the Lost Art Press blog as they are completed. These installments will be free for all, but Bjenk and I have a request: If you spot errors, typos, inconsistencies, or things that just don’t make sense, please drop us a line or leave a comment below that entry. We’ll look into it. We want this translation to work for working woodworkers. (And if you want to help translate, let us know that as well. There is plenty to do.)
This section is best read with plate 11 handy. By clicking on the link below, you can download a larger version that is easier to read.
Plate11_full.jpg (848.54 KB)This is an exciting personal project for Bjenk and me. And while I don’t know when we’ll be done or what we’ll learn, I know it’s going to be a great trip. As you’ll see as you read the first entry – about Roubo’s famous workbench from Plate 11 – the information is golden. During the next installment you’ll learn about preparing stock, and you’ll learn a little more about Bjenk.
— Christopher Schwarz
A note on dimensions: The French system of measurement in the 18th century is a little different than the modern imperial system. A French inch (pouce) is the equivalent to 1.066” in modern imperial. Each French inch is further divided into 12 “lines.” Each line is equivalent to .088” today. The French foot is 12.44”.
We chose to leave the French measurements intact in the text, but we’ve provided modern equivalents in brackets when Roubo discusses “lines” – which is a bit foreign to modern eyes. The other measurements in feet and inches have been left intact from the original manuscript. If you need to convert a certain measurement to a modern equivalent, you can use the paragraph above to make the conversion.
Menuisier, I. Part. Chap. V
Third Section
On tools for cutting and preparing wood
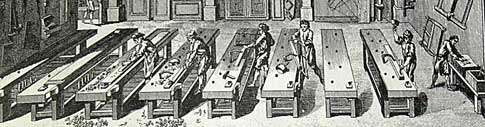
The workbench is the first and most necessary of all tools for “woodworking” (see translator’s note No. 1 below). It is made up of a top, four legs, four rails and a bottom. The top is made from a sturdy plank or table of 5” to 6” thick by 20” to 25” wide; its length varies from 6’ to 12’, but the most common length is 9’. This table is made out of elm or beech wood but most commonly from the latter, which is very stout and of a tighter grain than the other.
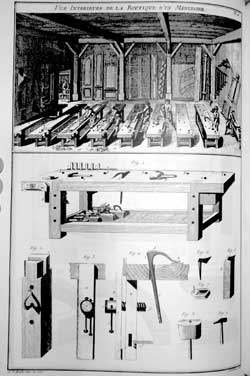
It must be pierced with many holes into which a holdfast can be placed. These holes must have 14 to 16 lines of diameter [1-1/4” to 1-13/32”] and must be pierced through the top of the bench perpendicularly. Their number is not fixed, but in general we must avoid making too many unnecessarily. Eight to nine is appropriate; that is, four placed 8” to 10” in from the front edge of the workbench, one of which will be 14” to 16” inches from the hook, and the others of equal distance starting from the right front leg of the bench until the first hole, like those that are a, a, a, a in Figure 1. The others b, b, b, b are pierced on the other side of the workbench and laid out so that they will be placed in the middle of the spaces between the holes at front, to about 1’ from each end of the workbench.
At 3” from the front edge of the top, we cut a mortise through the top that is 3” square, which must be very perpendicular and precisely straight inside so that the stop, which we insert into it with some resistance and that we raise or lower with a mallet, does not split the sides (of the mortise), which would happen if the inside was concave.
The stop must be 1’ long at least and made with very stiff and dry oak so that it can resist the mallet blows we have to administer to move it. At the top of this stop we place an iron hook, which has teeth similar to those of a saw, to hold the wood in place that we work on. We must observe that the hook is tight in the top of the stop and that the teeth are raised slightly so that when working with very thin pieces, we do not strike the hook and its teeth with the iron of the tools, which would happen if the back of the hook was more elevated than the front. The shank of the hook which enters the stop must be square in form and pointed at the tip. The shank and the top must not be welded but made of one piece that we bend with fire. The teeth of the hook must extend out the front of the stop by six to eight lines [1/2” to 11/16”]; extending the teeth more would be useless and problematic because the teeth could break. See figures 5 and 6, which represent a stop with its hook and a hook by itself.
The legs of the workbench are made from hard oak, very stiff, 6” wide by 3” or 4” in thickness; they are assembled through the top with through-tenons and through-dovetails. The custom is to make the tenon flush with the back of the leg, see figure 2. However, I believe that it would be best to leave a shoulder on the back of this same leg so that the top can rest on the shoulder on the back of the legs like on the front. This is so when workbenches get older, they don’t risk sinking in on their legs like it happens sometimes. The assembly of the legs (to the top) must be extremely tight especially along their width. And to make them even sturdier, we widen the mortises on top to make room for wood shims that we insert by force into the tenons, so that they spread in such a way “that they are as a tail” (maintained in a spread) in the mortises and consequently can’t slip back out.
The legs at the front of the workbench must be pierced by three holes each into which “leg holdfasts” are to be inserted. Around the workbench and 4” to 5” from the bottom of the legs, are assembled four rails of 4” wide or less by 2” thick. The bottom of the bench is filled with planks that are held with supports, figure 4, attached on the rails. Place the length of these planks perpendicular to the width of the workbench in order to give them more strength, like we can see in figure 1.
We must also place a drawer at the end of the workbench so the workmen can store their small tools like gouges, compasses, etc. There are even shops where workbenches are closed with planks all around, which is very convenient because it keeps shavings and dust out and the tools that we place inside are less likely to be lost.
The height of the workbench is ordinarily 30” but because workmen are not all of the same height, suffice it to say that the workbench must not be higher than the top of the thighs of the person working at the bench. If it were higher, it would deprive him of his strength and it would expose him to bad posture in a short time. We must also observe to place the heartwood side of the slab on top because it is harder than the other side. And if it is to move, it will only bulge on top instead of sagging.
Holdfasts are tools made of iron and are used to hold the work on the bench firmly and stably. They are ordinarily 18” to 20” and even 24” long in the shank; their thickness must be between 12 to 15 (1-1/16” to 1-5/16”) lines, and the curve of their paws is 9” to 10” long by around 10” high. They must be of very soft iron, forged in one piece so they don’t break. All their strength is in their head. That is why we will observe that from the head g to the paw k, they get thinner so that their extremity only has two lines (3/16”) of thickness at the most, which will make them more flexible and increase their pressure.
We must curve them so that when they are tightened they will only grip by the tip of the paw, because if they would carry more pressure in the middle they would ruin the work and hold less firmly (figure 4).
Moreover, it is easy to see that after long use, the shank of the holdfast will widen the holes of the workbench; and if it didn’t grip well by the tip, before long, it would soon carry all the pressure on the back of the paw and cause the problem I have mentioned above.
Engage the holdfast by hitting it on the head g with a mallet and release the holdfast by hitting the head in the other way, that is on its side and upward or on the side of the shank i. Holdfasts must never be polished because then they will not hold well. They should only be roughed up with a file or stone (see translator’s note No. 2). Only the paw must be clean and polished so it does not mar the work.
The “leg holdfasts” are not different, other than they are smaller. They hold the wood on its edge along the length of the workbench with the help of the wooden hook m, figure 1. This hook is fastened with screws or strong nails on the front edge of the workbench’s top and is sometimes arrayed with iron points. But because the points often ruin the work, it is best to remove them or to make them like in figure 5 (see the illustration of the hook).
“Ebonists” (Ébénistes) (see translator’s note No. 3) have a vise at the front of their workbenches, which is made of one piece of wood n n, figure 3 and 4, which is 4” to 5” wide by at least 2” thick. This piece is pierced in the middle of its width by a round hole through which passes the screw o p, to which the workbench leg q serves as its nut. This screw is usually wood and through its head passes an iron bolt r, with which tightens and loosens the screw. We adorn the head of the screw with an iron ring to prevent it from splitting.
The use of these vises is very convenient because not only do the vises hold the work very solidly, but they do not mar the work in any way. No matter how delicate the pieces are, we do not fear to ruin them. This is something we can’t do with a leg holdfast, which is holding the work only in one place and will sometimes break it if it is delicate.
I do not know why the “menuisiers en bâtiments” (see translator’s note No. 4) have not adopted this method, which not only is very convenient but is also not a hindrance or embarrassing in any way because the vise can be removed from the bench when it is not needed. When it is used, a wedge of the same thickness as the work must be placed at the bottom so that the screw can apply force everywhere equally. The piece for the vise n should be made slightly concave along its length so that when it is tightened, it grips at its tip. At the rear of the workbench s s, which is opposite the hook, we place a plank of about 18” long by 6” to 8” wide that is attached to wood supports that separate it from the workbench. This plank is named ratelier [rack] and is used to store tools with handles such as chisels, fermoirs, [a big chisel solid enough to receive mallet blows. It could have been for sculpting or mortising or anything that required rough work] etc. That is why we make the plank as wide as possible so that tools that are stored in it are not placed in a way that they can hurt somebody.
Next to this rack and along the length of the workbench we attach a bracket that is lower than the top by about 2” and is pierced at the end by a mortise of 3” long through which passes the blade of a try square [which looks like a triangle] t, which we place there when it is not needed.
Under the top of the workbench, we fasten a hollow piece of wood like a box with a screw into which we put grease to be used on tools to make them slide smoothly (Figure 7).
Translator’s notes:
1 Roubo explains at the start of volume one that “Menuiserie” includes all works made of wood. In truth, all trades had its “Menuisiers” but the term came to refer precisely to woodwork and its workers. A “Menuisier” in Roubo’s terms can be a joiner, a carpenter, an “ebonist,” a cabinetmaker, etc. When we have the foreword translated, all these terms will be made clearer as Roubo does make sure to explain them all in detail and he even go through its history. Note 4 goes into this in greater detail however.
2 Roubo’s exact words are “mais seulement reparés avec le carreau.” There are no mentions of such a tool other than the tailors iron to remove wrinkles in the ancient dictionaries of the French Academy versions of 1740, 1762 and after. After researching many old and ancient French dictionaries, the closest approximation I arrived at was that “carreau” is either a file or a stone. In Émile Littré’s “Dictionnaire de la langue Française,” under “carreau”; entry 15 refers to a big file used by locksmiths and entry 20 refers to a big stone of granite. The word “carreau” appeared as quarrel in the 11th century and it is easy to see its familiarity with quarry. As for the word “reparé” it is not meant as “réparé” (repaired) but in the sense of “pare,” prepared. So I am guessing Roubo is saying the holdfast is roughed out, or prepared, with something that is either a rough file or a rough stone.
3 The Ébénistes were organized as a guild of specialized menuisiers (woodworkers) in veneering and inlays in Roubo’s time.
4 The terms “menuisiers en bâtiments” are not easily translated. Menuisier en bâtiment can only be understood in the context of how trades and crafts were defined in relation to each other in 18th -century France. Take note of the difference: menuisier refers to the worker while menuiserie refers to the craft. Crafts were grouped under guilds and had their secrets to protect. They went through extensive changes when the French Revolution abolished the guilds and later with Napoleon’s reforms. These changes are also part of the explanation why 18th century French tools are mostly no longer around but I digress. Let it be said for now that the Menuisier en Bâtiment was a highly skilled woodworker that was adept at a bit of everything. Bâtiments, in the old French dictionaries of the 18th century referred to all constructions more particularly destined to house humans, animals or things as well as ships (Littré, 1872-1877). Note: a popular expression was also used in Paris at the time: “être du bâtiment”; to be of the trade, of the craft. Roubo associates Menuiserie en bâtiments to assemblies of all kinds and their vast applications, all the way up to detailed work like ornamentations. The techniques and methods are described as the foundation for all other kinds of woodworking. So, Roubo refers to the Menuiserie en bâtiments as the founding craft from which branches off all the others. This could be why he focuses most of the techniques and tools under the category of “Menuiserie en bâtiments”. Volume 1 is, after all, the biggest of all five. It is interesting to note that Roubo describes the furniture makers as the lower skilled woodworkers for reasons we will explore at a later time.