The following is excerpted from the third edition of Christian Becksvoort’s “With the Grain: A Craftsman’s Guide to Understanding Wood.”
It is, above all, succinct, easy to understand and perfectly suited for the furniture-maker. As important as what is in its 160 pages is what is not. It’s not a detailed analysis of cell growth. It is not a heap of tables and equations for figuring truss loads in residential construction. It is decidedly not a scientist’s approach to the material.
Instead, “With the Grain” contains the facts you need to know at the lumberyard, in the woodlot and in the shop. It gives you enough science so you understand how trees grow. It explains the handful of formulas you have to know as a furniture-maker. And it gives you a hearty dose of specific information about North American species that will inspire you. Becksvoort encourages you to use the trees in your neighborhood and makes the case that just because you cannot find catalpa at the lumberyard doesn’t mean it’s not a good furniture wood.
You’ll learn to identify the trees around you from their silhouette, leaves and shoots. And you’ll learn about how these species work in the shop – both their advantages and pitfalls.
Becksvoort then takes you into a detailed discussion of how wood reacts to it environment – the heart of the book. You’ll learn how to calculate and accommodate wood movement with confidence and precision. And you’ll learn how to design furniture assemblies – casework, drawers, doors and moulding – so they will move with the seasons without cracking.
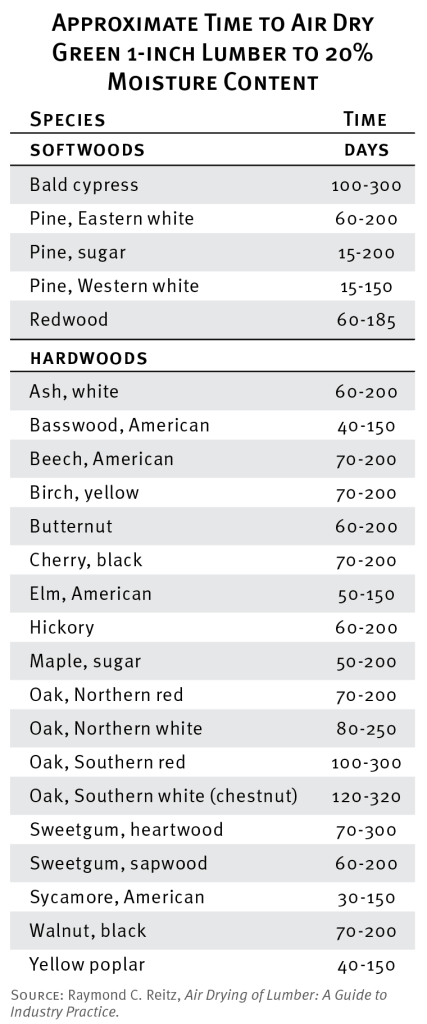
Numerous considerations influence the air drying of lumber, among them:
Climatic conditions. Generally speaking, very little drying of lumber is possible during the winter, particularly in those areas where the temperature remains below freezing. Moisture close to the surface can evaporate by the process of sublimation, whereby the water goes from a solid state (ice) directly to a gaseous state (vapor) without becoming a liquid. In areas where winter temperatures are relatively mild, some drying will occur, as long as rainfall and humidity are not excessive. Drying rates are variable and often very localized. The location of the drying pile and even its orientation to the sun and prevailing wind all influence the rate of evaporation.
Species. The wood species makes quite a difference when it comes to length of drying time. Specific gravity is a fairly good general indicator of drying rate. The lower the specific gravity, the faster the drying time. The softwoods and lighter species of hardwoods dry faster under favorable conditions. The percentage of sapwood and heartwood also plays a part. For example, sugar maple dries faster than Northern red oak with roughly the same specific gravity, but sugar maple has more sapwood. Figure 4-11 lists the approximate air-drying times of some native woods.
Thickness. The old rule of thumb “one year of drying for each inch of thickness” has no basis in fact. First, it does not take species into account. Second, drying time is a function of the square of the thickness. This means that 8/4, or 2″ (5 cm) stock takes four times as long as 4/4, or 1″ (2.5 cm) stock. In fact, for some species the drying time is even longer than the square of the thickness. This is one reason (along with the differential between radial and tangential shrinkage, described in Chapter 5) why it is next to impossible to dry entire logs without serious cracking or checking.
Grain orientation. Quartersawn wood is slower to dry than plain-sawn wood. The ray cells aid in drying, and although they appear more prominent on quartersawn wood, not nearly as many are exposed on the face of the board.
Pile construction and foundation. The actual method of stacking the wood has a lot to do with the drying rate. Adequate space left around each board aids in drying. Many smaller piles dry faster than one large pile. The pile foundation should be well off the ground to allow for free air movement underneath. Weeds and debris should not obstruct the air flow. Finally, the ground should be well drained, with no standing water.
PREPARATION OF THE WOOD
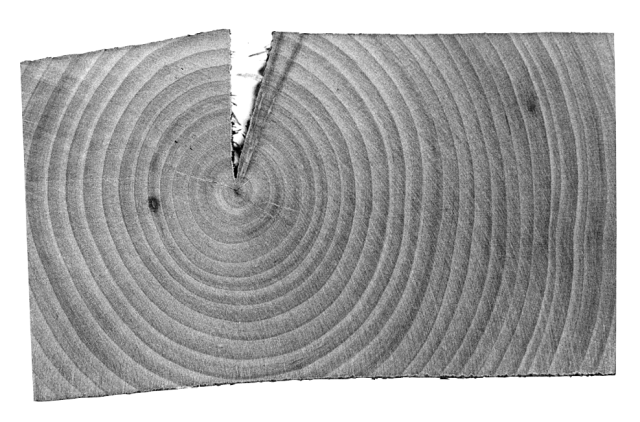
The proper preparation for drying wood can yield much higher returns in sound wood, and in some cases can prevent near total loss due to checking and warping. Whenever possible, the pith of the tree should be cut out and discarded because as boards containing pith usually check. Large planks or timbers will check no matter how carefully they are dried (Fig. 4-12). Any heavy timbers or carving blocks should have the pith removed if they are expected to dry without serious checking.
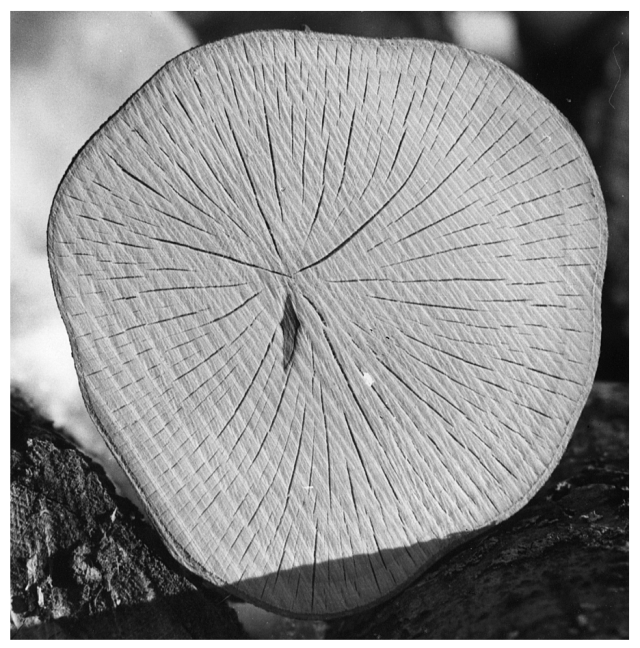
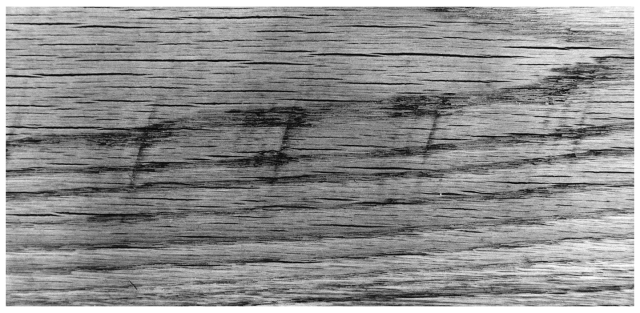
Because exposed pores or tracheids on the end-grain surfaces promote too-rapid drying and result in checks (Fig. 4-13), it is wise to coat the ends of boards to slow the moisture loss from the end grain. Almost any impervious material will do. Wet wood can receive a primer of acrylic latex paint first. Aluminum paint, oil paint even melted paraffin will seal the wood. Coat the ends as soon as possible after sawing to minimize end checks. In woods such as beech, checking can begin in a matter of hours. Oak is also quite susceptible (Fig 4-14). Once checking occurs, the damage is done.
STACKING THE PILE
When constructing the lumber pile, select a clear, relatively flat and well-drained site. Construct a foundation of cinder blocks, bricks, fieldstones or very heavy timbers. Timbers are also useful on top of the foundation to raise the pile further off the ground and to help level the foundation. Foundation blocks, posts or rows should be about 24″ to 36″ (61-91 cm) apart, and a minimum of 12″ (30 cm) off the ground. Figure 4-15 shows the proper construction of a pile of lumber for air drying. The width of the pile may vary, although 3′ to 4′ (.9-1.2 m) is ideal. Piles much narrower become tippy, and piles wider than 4′ (1.2 m) not only become hard to stack, but begin to retard ventilation, and should have a space or flue left in the center for additional circulation. As long as the pile is stable, there is no restriction on the height. In mill yards they are often stacked with a forklift to 35′ (10.7 m).
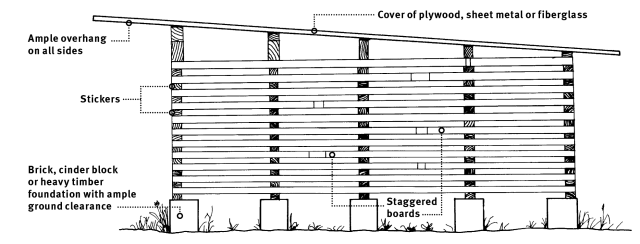
Place the first layer of boards about 1″ (2.5 cm) apart, with the ends of the boards even with the ends of the pile. Several shorter boards can be staggered to fill a row. Lay strips, or stickers, at right angles across the boards directly above the foundation planks. The stickers must be of equal thickness to provide equal support between the layers. They should also be dry to prevent sticker staining. Add layers until the desired height is reached with all stickers stacked above the foundation supports. Several heavy planks or cinder blocks can be placed on top for extra weight to prevent warping. Finally, add corrugated metal or plywood on top as a cover. Overhang is desired on all sides for shade.
Air drying is not without risk because the weather cannot be controlled. If drying takes place to rapidly, especially in full sun, surface and end checking may occur. On the other hand, if drying is too slow, mildew and fungal staining may result. Following these rules closely will increase the chances of success: high, well-ventilated foundation, dry stickers, proper spacing of boards, sealed end grain and weighted cover with good overhang (Fig. 4-16).
Those who dry wood regularly sometimes prefer to build a drying shed. A very simple shed consists of four posts and a roof, and takes little time and materials to construct. A lean-to behind a barn or shop also serves the purpose. An ideal drying shed would be oriented toward the prevailing wind, and have large doors on either end. These would be open during dry weather, and closed during inclement weather.

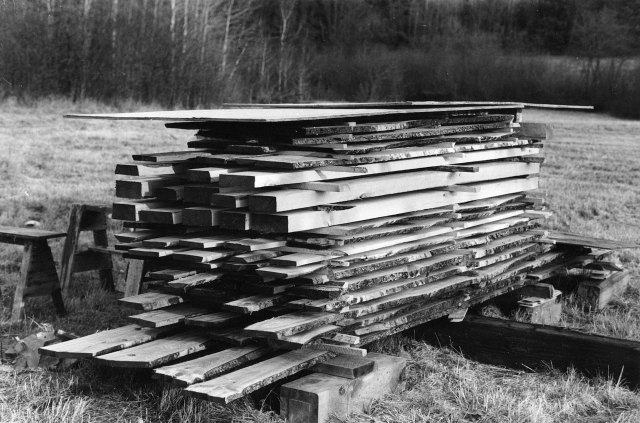
Figure 4-17 shows a lean-to with a few piles of wood stacked and ready for end coating. Some of the wood is stacked in sawn order. This makes it easier to select wood from the same tree, and facilitates color- and book-matching.
Under the best of conditions, outdoor air drying will yield an equilibrium moisture content of 12 percent to 18 percent. At this point, the wood should be moved indoors to an area of artificial heat for further drying: a loft, shop, warm attic or basement. A look back at Figure 4-9 will enable review of the necessary temperature and humidity levels for wood to reach the desired equilibrium moisture content.
Ideally, this last drying step to reach the intended indoor EMC should utilize existing space and heat sources to avoid any additional costs. The biggest advantage to air drying is the low cost because there is no need for fancy equipment or energy.
Anyone can air dry wood, with most of the energy supplied by the sun and wind.
CALCULATING MOISTURE CONTENT
The woodworker must always be aware of the moisture content of the material, especially during the drying process. Careful monitoring of the rate of drying will determine when the wood reaches the EMC for a given location and climate. The wood can then be moved to an area of lower humidity or higher temperature, so the moisture content can be further reduced. When the wood finally reaches the desired level of moisture, it will be ready for use.
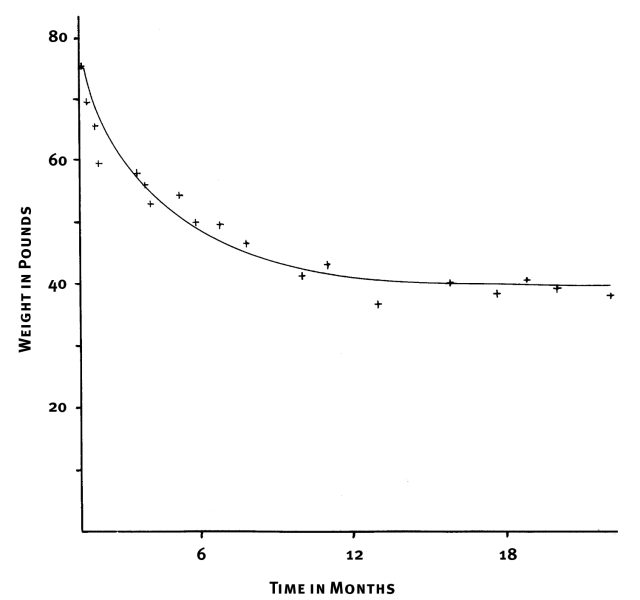
Several methods can be used to determine moisture content. A rough, yet simple procedure for tracing moisture content (by way of EMC), is by weight. A few pieces of wood are designated as samples, are weighed and recorded when green, and then weighed again every few weeks thereafter. Depending on the size of the sample, weighing can be done on a bathroom, baby or food scale. The samples should have the same drying treatment as the rest of the wood. Weights are recorded as a graph to give a visual representation of the moisture loss and the approximate point at which the wood reaches its EMC with its surroundings. At that point, the sample will no longer lose weight under the present conditions. Figure 4-18 charts the weight loss of a large ash board over a period of almost two years.
If the prevailing temperature and humidity are known, a glance at Figure 4-9 will give a rough idea of the moisture content. For example, if the weight has remained more or less constant for the previous 8-10 weeks, the temperature has been averaging 60°F (16°C), and the humidity about 80 percent, then the moisture content would be about 16 percent.
A more precise method of moisture detection involves the use of an accurate scale and an oven. A lab oven, kitchen oven or toaster oven with accurate temperature control will work. Cut and weigh a sample small enough to fit into the oven. Place the sample in the oven at 212° to 220° F (100° to 104° C), and remove every hour for re-weighing, until no more weight is lost. At that point all the moisture has been driven off and the moisture content reduced to 0% (oven dry). The moisture content of the sample can be determined before baking with the following formula:
MC = Initial weight – oven-dry weight x 100
Oven-dry weight
Other samples can be baked at any time, their weights used in the formula to determine their current MC.
Weight and moisture content are directly proportional. The wood material never changes weight, it merely takes on or releases moisture, which accounts for the weight change. This relationship allows for the use of a graph for determining the approximate MC of identical samples. The samples should be from the same board, and the same size and weight. To do this, bake the first sample and record both its initial and oven dry weights, as shown in Figure 4-19. Draw a straight line between the two points. For example, if the initial weight of the samples is 48 ounces (1.36 kg), and at a later date the weight of a partially dry sample is 40 ounces (1.13 kg), then the current moisture content of that sample is 52 percent.
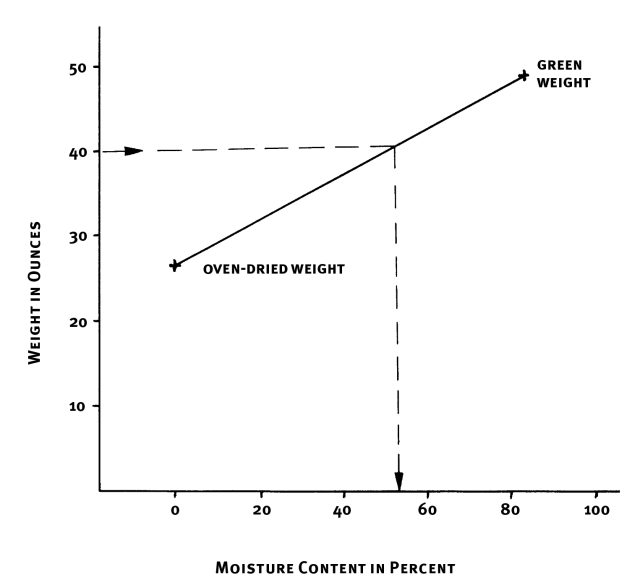
relationship.
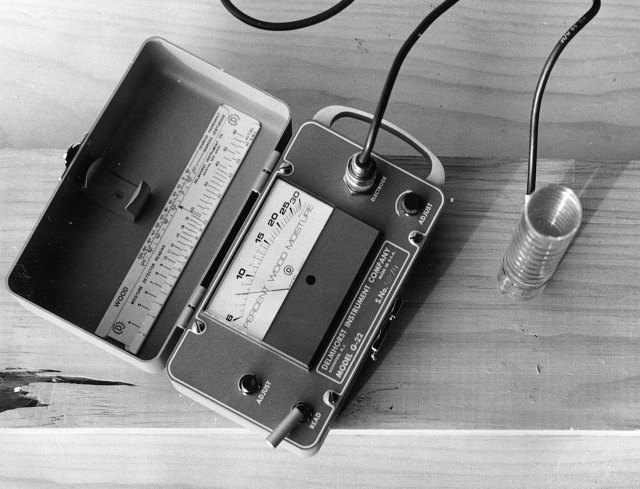
The fastest and easiest method of determining moisture content is with an electric moisture meter. Two types are most commonly available. The first, dielectric meters, generate a radio frequency that penetrates to a predetermined depth when placed against the wood. The power loss is translated and read as a moisture content percentage on the meter. The second type, pin type, is an ohm meter that measures the resistance of wood to an electric current. Wood is an insulator, and water a conductor, so the resistance to passage of electricity is a function of moisture present in the wood. Damp wood offers a better path for electric current and gives a higher reading than drier wood, which offers more resistance and yields a lower reading. A deflecting needle shows the MC on a scale. Most meters read between 6 percent and 30 percent (Fig. 4-20).
Using the instrument is fairly simple. The electrodes are pushed or driven into the wood so that the current flows parallel to the grain, a button is pushed and the needle shows a reading of MC. A chart is included that allows for different electrical properties of various species, as well as temperature. Several readings should be taken at various points, and averaged for greatest accuracy. Moisture meters are useful not only when wood is being dried, but also during the process of building furniture. The meter gives a clue as to the amount of expansion or contraction to be expected in backs, doors, panels and drawers (see Chapter 5). Any serious woodworker should have a moisture meter.
/*<![CDATA[*/
(function () {
var scriptURL = 'https://sdks.shopifycdn.com/buy-button/latest/buy-button-storefront.min.js';
if (window.ShopifyBuy) {
if (window.ShopifyBuy.UI) {
ShopifyBuyInit();
} else {
loadScript();
}
} else {
loadScript();
}
function loadScript() {
var script = document.createElement('script');
script.async = true;
script.src = scriptURL;
(document.getElementsByTagName('head')[0] || document.getElementsByTagName('body')[0]).appendChild(script);
script.onload = ShopifyBuyInit;
}
function ShopifyBuyInit() {
var client = ShopifyBuy.buildClient({
domain: 'lost-art-press-test.myshopify.com',
storefrontAccessToken: 'f83226aac752f3a8e262f8a8273c9739',
});
ShopifyBuy.UI.onReady(client).then(function (ui) {
ui.createComponent('product', {
id: '224168197',
node: document.getElementById('product-component-1678805075417'),
moneyFormat: '%24%7B%7Bamount%7D%7D',
options: {
"product": {
"styles": {
"product": {
"@media (min-width: 601px)": {
"max-width": "calc(25% – 20px)",
"margin-left": "20px",
"margin-bottom": "50px"
}
},
"button": {
"font-size": "14px",
"padding-top": "15px",
"padding-bottom": "15px",
"border-radius": "11px",
"padding-left": "22px",
"padding-right": "22px"
},
"quantityInput": {
"font-size": "14px",
"padding-top": "15px",
"padding-bottom": "15px"
}
},
"text": {
"button": "Add to cart"
}
},
"productSet": {
"styles": {
"products": {
"@media (min-width: 601px)": {
"margin-left": "-20px"
}
}
}
},
"modalProduct": {
"contents": {
"img": false,
"imgWithCarousel": true,
"button": false,
"buttonWithQuantity": true
},
"styles": {
"product": {
"@media (min-width: 601px)": {
"max-width": "100%",
"margin-left": "0px",
"margin-bottom": "0px"
}
},
"button": {
"font-size": "14px",
"padding-top": "15px",
"padding-bottom": "15px",
"border-radius": "11px",
"padding-left": "22px",
"padding-right": "22px"
},
"quantityInput": {
"font-size": "14px",
"padding-top": "15px",
"padding-bottom": "15px"
}
},
"text": {
"button": "Add to cart"
}
},
"option": {},
"cart": {
"styles": {
"button": {
"font-size": "14px",
"padding-top": "15px",
"padding-bottom": "15px",
"border-radius": "11px"
}
},
"text": {
"total": "Subtotal",
"button": "Checkout"
}
},
"toggle": {
"styles": {
"count": {
"font-size": "14px"
}
}
}
},
});
});
}
})();
/*]]>*/