The following is excerpted from “The Intelligent Hand,” by David Binnington Savage. The book is a peek into a woodworking life that’s at a level that most of us can barely imagine. The customers are wealthy and eccentric. The designs have to leap off the page. And the craftsmanship has to be utterly, utterly flawless.
How does one get to this point? And how do you stay there?
One answer to these questions is in this book. Yes, the furniture can be technically difficult to make. But a lot of the hard labor involves some unexpected skills. Listening. Seeing. Drawing. And looking into the mirror and practicing the expression: “And that will cost 20,000 pounds.”
As you will see, it’s a personal struggle – like the production of this book. On the day David began work on his manuscript, he received a cancer diagnosis with a grim prognosis. He wasn’t sure what the book was going to be about or if he could finish it. But David attacked the work with the fervor of a younger, healthier man.
So what is it about? On the one hand, “The Intelligent Hand” is the story of a boy with a stammer who became one of the leading furniture designers in the U.K., working for clients all over the world, including Saudi Arabia and China. It’s a story of extreme failure – bankruptcy – and how he built a new life using the debris from the broken one.
It’s a practical and iconoclastic guide to getting started in woodwork. David has always had pointed opinions about the tools and methods his students should use to get good results. And he shares – in great detail – his recommendations for tools, sharpening, cutting dovetails and building a proper workbench.
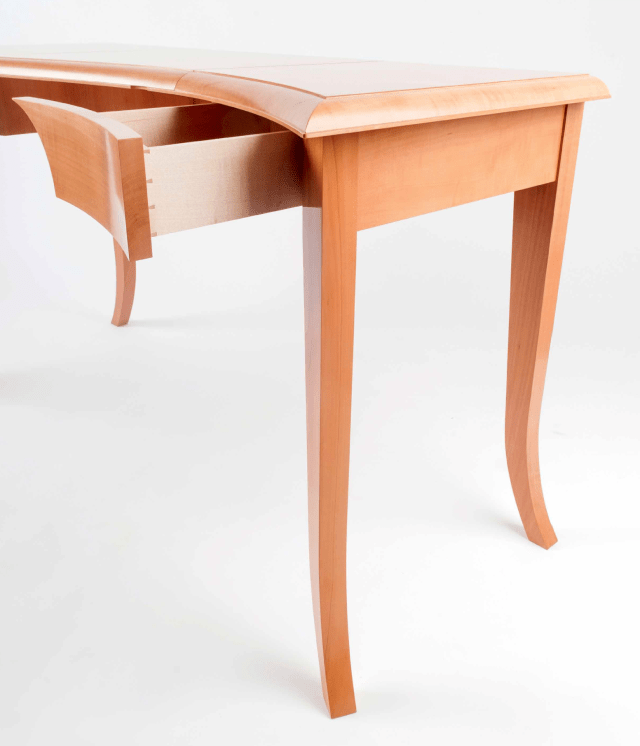
There are times when I wonder what is going on. That’s a pretty usual state of mind for me. I seem to get nearer and nearer to waving my stick at the seagulls and shouting at passing cars. But when it comes to “making,” this disconnection usually involves piles of expensive jigs and the spindle moulder (or shaper, as you guys call it). I see a pile of jigs made beautifully and look at the product – in this case four desk legs – and wonder why the desk legs were not made by hand, just as quickly.
I have never been able to win this argument with Daren, and my last workshop sought to become more efficient by making more jigs. We even had a room full of these useless implements. “Ah we should keep the jigs; we may make a chair leg very similar.” That’s how the argument goes, but by that time three things have happened. One, you can never find all the bits of jig for the necessary complex and clever sequence of machining; they are hidden beneath the pile of subsequent jigs. Two, the maker who invented this clever contraption has long since moved on and exactly how these bits of MDF fit together moved with him. Three, your old jig never quite does the new shape and you end up making a new jig.
Many makers love making jigs. Jigs keep us out of the firing line. Making even four identical forms by hand, can of course be done, but when there is a machine that will replicate shapes, most makers will dive for the cover that a jig provides. And jig design enables us to show how clever we are. Well, here we go.
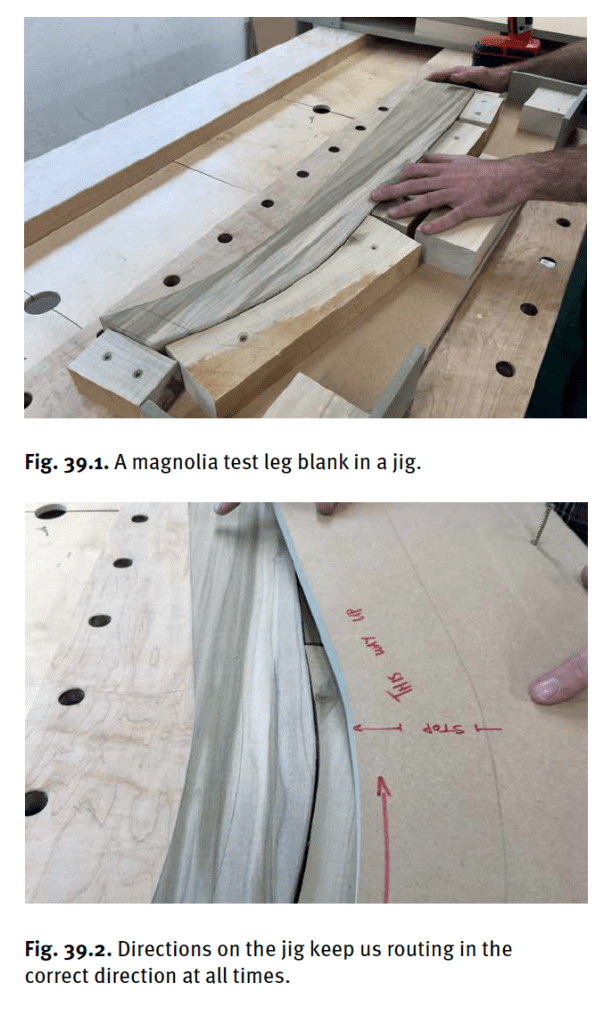
Steve has made a box jig (so-called because it looks a bit like a box and the job fits inside it). The idea is clever and sensitive to the material and the design. (Note that in the photos above, Steve is running a test leg in magnolia, which is why it looks greenish.) In this case we have legs that curve out at the bottom. This means that the grain of the pear would be roughed up if machined in one direction. So, he made this jig, which enables him to turn the job over and machine the short curved ankle from one end and the long straight leg from the other direction. That is because he has two identical guiding surfaces, one directly above the other. You can see in the photos the red line that tells him to stop and turn over. Clever jig, this be.
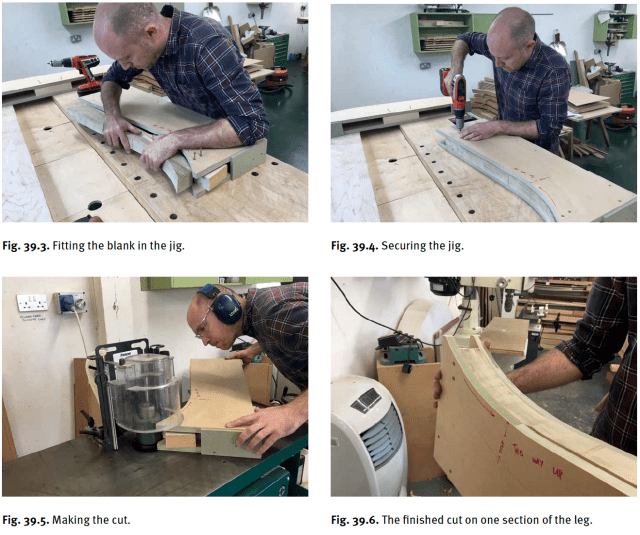
The photo above shows the cutter block running above a guide ring. The jig is in contact with the guide ring, and the cutters trim the job above to the exact size.
Spindle moulders really are great tools. They do the same thing as a router inverted in a table, but they do it better. The heavy mass of the cutter block provides heft through the cut, so the block spins at lower speed than a router and gives a cleaner cut.
Don’t look so surprised, Steve (see above). Handwork was called “Workmanship of Risk” by David Pye in his wonderful book “The Nature and Art of Workmanship” – what you are doing is “Workmanship of Certainty” – this is the industrial process of replication coming into small workshops.
OK – back to the bench shop. This pair of legs with two rails is what we are after; these will be the outer frames joined by a rail at the back. Each of the two frames has two side rails – a bit of overkill, but our structure is potentially wobbly in the middle so we need stiffness at the side structures, and we need to transfer that stiffness to the centre. We will do that with the addition of the drawer carcases joined to the leg frame. We don’t know for sure that it will be stiff enough – had we made a maquette we could have checked that out – but we are pretty confident. Furniture makers don’t have structural engineers to tell us the tensions involved. We only go on what we have done before, the stuff that hasn’t yet fallen down.
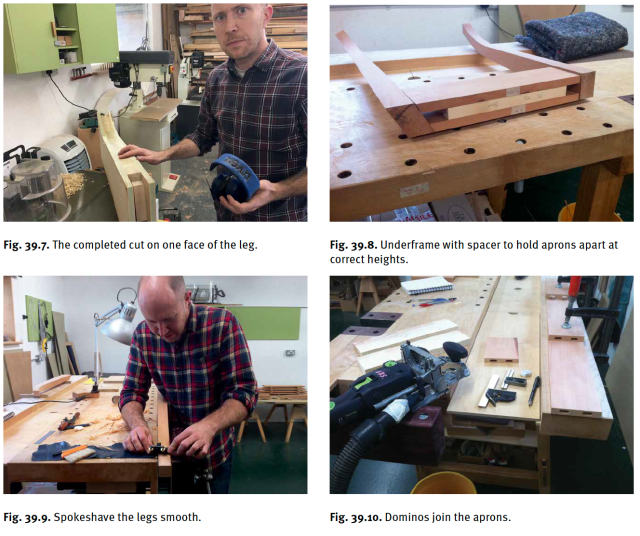
First Steve has to take the machined surface off the legs. Above, he’s working on the twisted surface of the front leg. Careful shaping with a spokeshave is needed. The components are joined together with Festool Dominos – small loose tenons. They give us enough strength for the joint and eliminate a deal of semi-complex joinery.
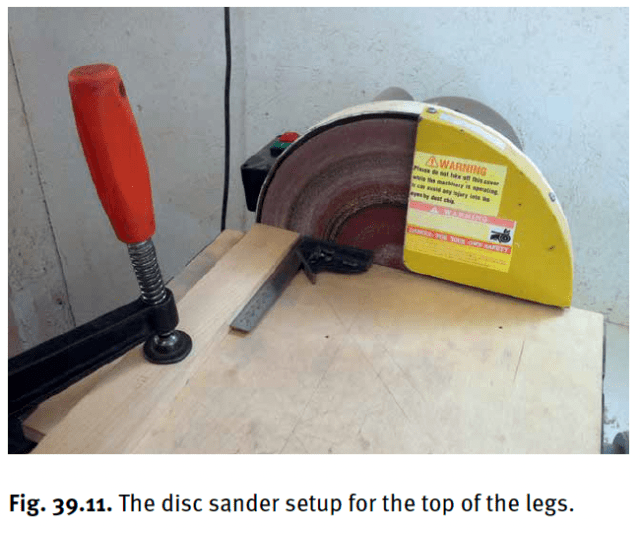
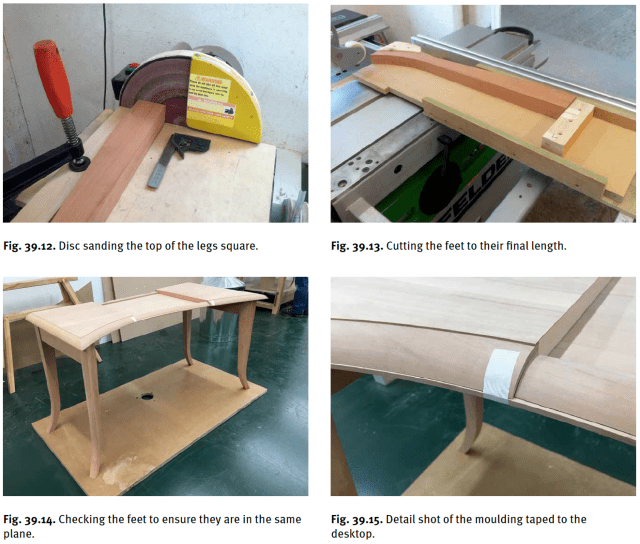
This, at right [above], is our disc sander, which gets a lot of use. Steve sets it up square to sand the top of a leg component, as shown. He then takes the leg to the table saw and puts it in another jig to cut the foot to length. All the legs will be cut in this jig, so it is essential that the stop’s end is sanded square so we get accurate Leg lengths. We learnt this by making batches of two dozen chairs that didn’t wobble!
This is a big moment – getting the job to stand on its own feet so you can have a good look at the proportions and see what needs fixing. So far so good, but we next need the drawer compartments made and fitted.
The exhibition date is looming large, and both Daren and Steve are working weekends – my wages bill is eyewatering. But Daren has not yet booked the van to deliver the piece to the exhibition, which worries me. When he does that, I will know we are going to make it.
OK, last lap. Now it’s on to the final joinery and polishing before assembly. This is critical; you do not want to be polishing into corners if you can avoid it. Above, Steve using our standard shellac and wax finish for secondary and inside surfaces; apply it with a rubber that is kept in a glass jar. The rubber has a lambswool or wadding interior and fine cotton exterior. This holds the polish. As Steve moves the rubber and presses down, the polish is released. The shellac polish in the small bottle is very dilute, maybe less than a 1 lb.-cut (one pound weight of shellac dissolved in one gallon of alcohol). The other bottle contains mineral oil – use just a small dab to keep the rubber moving.
The aim is not a full shine, but to seal the surface and finish with a good wax polish. This is a quick and easy finish in the workshop, as shellac flashes off very fast. You wouldn’t want to polish with someone sanding on the next bench, but you can generally polish in the workshop without too many special measures. If I had a high-shine job to do, I would try to find a dust-free room, or I’d do the polish at the weekend when the dust had settled.
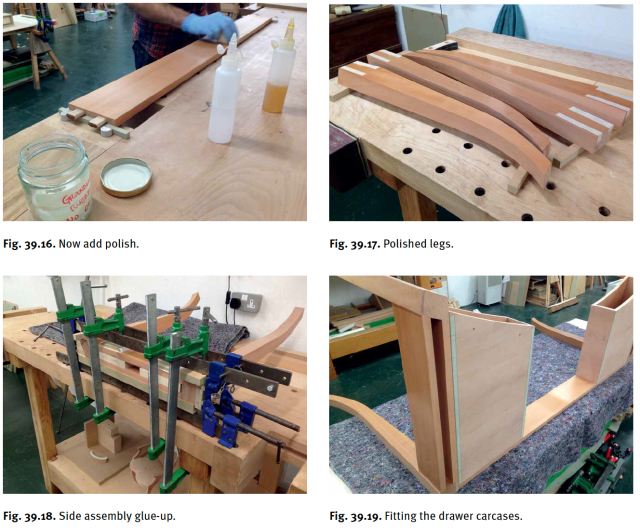
Let’s take a careful look at the glue-up above. There are eight cramps and only four components. Look at the angle-cramping block at the top of the far leg. Notice the support blocks between the double rails to stop them from bending under pressure. Notice also the small paper-faced cramping blocks to stop the blocks from marking the new polish. Ye Gods – the care these guys are now taking as they get near to the finish line.
Now we can see the drawer carcases fit. These are critical to the structure, providing stiffness to the front of the desk. Note how we avoid work that is not necessary; lippings on MDF components that are never seen after assembly are omitted. If, however, this area would be visible, even to a 4-year-old crawling underneath, it would get lipped, then veneered and polished. That 4-year-old could grow up to be a customer.
/*<![CDATA[*/
(function () {
var scriptURL = 'https://sdks.shopifycdn.com/buy-button/latest/buy-button-storefront.min.js';
if (window.ShopifyBuy) {
if (window.ShopifyBuy.UI) {
ShopifyBuyInit();
} else {
loadScript();
}
} else {
loadScript();
}
function loadScript() {
var script = document.createElement('script');
script.async = true;
script.src = scriptURL;
(document.getElementsByTagName('head')[0] || document.getElementsByTagName('body')[0]).appendChild(script);
script.onload = ShopifyBuyInit;
}
function ShopifyBuyInit() {
var client = ShopifyBuy.buildClient({
domain: 'lost-art-press-test.myshopify.com',
storefrontAccessToken: 'f83226aac752f3a8e262f8a8273c9739',
});
ShopifyBuy.UI.onReady(client).then(function (ui) {
ui.createComponent('product', {
id: '1442394374207',
node: document.getElementById('product-component-1680376640446'),
moneyFormat: '%24%7B%7Bamount%7D%7D',
options: {
"product": {
"styles": {
"product": {
"@media (min-width: 601px)": {
"max-width": "calc(25% – 20px)",
"margin-left": "20px",
"margin-bottom": "50px"
}
},
"button": {
"font-size": "14px",
"padding-top": "15px",
"padding-bottom": "15px",
"border-radius": "11px",
"padding-left": "22px",
"padding-right": "22px"
},
"quantityInput": {
"font-size": "14px",
"padding-top": "15px",
"padding-bottom": "15px"
}
},
"text": {
"button": "Add to cart"
}
},
"productSet": {
"styles": {
"products": {
"@media (min-width: 601px)": {
"margin-left": "-20px"
}
}
}
},
"modalProduct": {
"contents": {
"img": false,
"imgWithCarousel": true,
"button": false,
"buttonWithQuantity": true
},
"styles": {
"product": {
"@media (min-width: 601px)": {
"max-width": "100%",
"margin-left": "0px",
"margin-bottom": "0px"
}
},
"button": {
"font-size": "14px",
"padding-top": "15px",
"padding-bottom": "15px",
"border-radius": "11px",
"padding-left": "22px",
"padding-right": "22px"
},
"quantityInput": {
"font-size": "14px",
"padding-top": "15px",
"padding-bottom": "15px"
}
},
"text": {
"button": "Add to cart"
}
},
"option": {},
"cart": {
"styles": {
"button": {
"font-size": "14px",
"padding-top": "15px",
"padding-bottom": "15px",
"border-radius": "11px"
}
},
"text": {
"total": "Subtotal",
"button": "Checkout"
}
},
"toggle": {
"styles": {
"count": {
"font-size": "14px"
}
}
}
},
});
});
}
})();
/*]]>*/